Posted on

Slip Bobbering Early Season Walleyes by Greg Bohn with Scott Richardson

Slip Bobbering Early Season Walleyes! by Greg Bohn with Scott Richardson

Two traits of spring, a strong breeze and cold water, make the season the perfect time to target walleyes using slip bobbers.

Nothing ignites the action of bait below a slip bobber more than wind-driven waves on the surface, and a stiff southerly breeze common early in the year helps concentrate fish on structure.

Add to that the fact walleyes in cold water will bite, but not chase, and it’s clear why slip bobbers that suspend a bait in front of a hungry walleye will outpace other faster presentations.

A third factor also should make up your mind to reach for slip bobbers in April and May.  Walleyes are often shallow early in the season.  Though slip bobbers are great tools for deep water, they shine when fish are in water less than 10 feet deep.

uploaded-2006-03-02-679656112Finding Early Walleyes

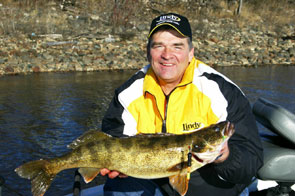
Temperature is key to locating active walleyes early in the year.  Lakes of 500 acres or so, especially those with dark bottoms, will warm first.   Walleyes there could be spawned out while walleyes in mid-sized lakes or larger lakes are in pre-spawn mode or spawning.      Walleyes lay eggs from 42 degrees to about 48 degrees.   Once water reaches 50 degrees, slip bobbers are killer.  Choose lakes where walleyes have just finished spawning, which should offer the chance to catch both male and larger female fish.

Temperature continues to play a critical role once you’ve targeted a specific lake.  Even if water is only slightly warmer than the surrounding area, walleyes will find it.   A difference of just a couple of degrees can mean the difference between no fish and fish.

Remember, too, temperature on a body of water can swing significantly in spring during the course of a day.  The coat you wore at sunrise is off by 10 a.m.  Preferred location can change just as dramatically.  Some anglers might think the fish quit biting.  But, they simply moved.

Structures that offer hard bottoms, including shoreline points, islands and mid-lake rock structures, are likely to hold the most walleyes.

The best points offer rocks, newly emerging weeds or wood.   One stump may hold many fish, and it will day after day.

Islands with gravel bases deserve extra attention.  Mid-lake rocky structures are great, too, if they’re shallow enough to allow the sun to warm them.

Sand bars with fingers and bays with sandy bottoms are also tremendous fish attractors.  They may look too clean, too featureless, to hold walleyes, but they do.  With flat bottoms and depths of 10 feet or less, they’re perfect to attack with slip bobber rigs.

The best structures will be the ones where the wind is pounding the hardest because warm surface water will be blown there.

Don’t be afraid to change lakes in the course of a day, too.  Fish might be shallow early in a clear water lake, then move off to deeper water where they are harder to catch as the sun rises.  If that happens, pick a darker, stained-water lake for mid-day action.

Boat traffic is another consideration.  Walleyes are skittish at this time of year, so fishing busy places can reduce your odds in a hurry.  Try to stay off the beaten path.

A Strategy That Works

Slip bobbers have a drawback.  They can be a very slow way to find fish.  Try using a jig to locate “Judas” fish, the active ones that bite faster presentations.  They give away the location of the school.   Once you know where the fish are, slow down with slip bobbers, a presentation more in tune with the overall mood of the walleyes in colder water.

The basic slip bobber rig includes a thread bobber stop, a glass bead, a slip bobber, a Lindy NO-SNAGG barrel swivel, a leader of line lighter than the main line and a hook or jig.

Best slip bobbers for springtime conditions are weighted to let you cast into the wind.  That lets the breeze work for you by blowing the slip bobber back to the boat and beyond to cover a larger area searching for fish.

There are lots of floats on the market, but stick with ones that are painted and visible.  One good choice is the new Thill Pro Series.  The large is PSW 115, the medium is PSW 110.  The weight is removable.   Or, if you prefer non-weighted models, the PS 115 is the large and the LS 110 is the medium.

The Gold Medal Supreme Super Shy Bite (IM 201) is another great choice.  They have easy-on, easy-off capability to adjust the size of the float to meet changing conditions in wind, depth or the distance you want to reach.

The Float-Hi 783W in pink or orange is a highly visible foam float.

Choose a float one size larger than you think you’ll need.  The primary bait you’ll be using is a redtail chub, a sucker or a fathead minnow.  A three can pull small floats down, giving false hope of a strike.

Always take at least two bait choices along.  One of the trio may be the primary forage of a lake or walleyes may just prefer one over the other two on a given day.    It can be a long day if you don’t have the right one along.

Gold hooks seem to work best early in the year.  Use a number 4 or number 6 Mustad Aberdeen for fatheads.  Switch to a bleeding red Tru-Turn in a number 4 or number 2 for larger chubs.

Add a red glass bead and a small 0 or 00 Colorado or Indiana blade on a clevis above the hook.  When you are drifting or the minnow swims, the blade gives off a flash that walleyes like.  A silver blade is best in clear water, a gold blade is best in stained or darker water.

uploaded-2006-03-02-620485429The Business End of Rigging

Hook the bait between the dorsal fin and the tail.   It must appear lively, so change bait often.

Set the bobber stop so the bait is about one foot off the bottom, the most active zone.

As you drift and cast a jig, set bobbers near the boat, including at least one directly in the cone of the electronics.  Watch for signs of fish moving toward the bait, but balking before they take it.  They might not like the size of the chub or it may be a sign to change to a fathead.

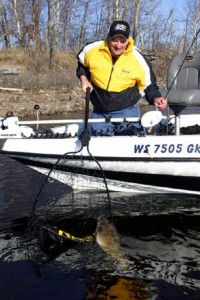
If you catch one, toss a black buoy to avoid attention or better yet, mark a waypoint on the GPS.  Drift beyond the spot before carefully and quietly dropping anchors to thoroughly fish the area.   Where there was one walleye, there’ll be more unless you make too much noise pounding an anchor on the bottom.  If action slows, start the search again.

Posted on

Ice Perch’n Wisconsin Style by Greg Bohn with Scott Richardson

Ice Perch’n Wisconsin Style by Greg Bohn with Scott Richardson

Mention Vilas and Oneida County, Wis., to an ice fisherman, and he’s likely to think, “walleye,” or “crappie.”  But, when the weather turns bitter cold, Oneida County fishing guide Greg Bohn thinks of another species that’s often overlooked  – nice yellow perch.

“People typically come here for tip-up or tip-down walleyes,” said Bohn.  Those that don’t, fish the hard water for bluegill and crappie. “But, we have very, very nice perch that have gone unnoticed for years.”

uploaded-2007-12-17-553027801
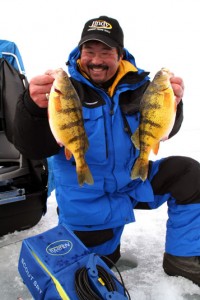
Wisconsin perch are being discovered as restrictions on perch are tightened in other states better known as winter perch destinations, such as Minnesota or the Dakotas.  Perch in those places I agree may be bigger on average.  But Wisconsin perch average 8.5 to 11 inches, and you can harvest 25 of them each day.  That ain’t all bad! Perch here are plentiful and according to Bohn, could use some angler pressure. Add crappies many up to 13 inches and a few nice big bluegills to the 25-a-day panfish limit and you have an ice angler’s dream.

No matter where you fish for perch, Bohn has an approach that works. That’s very evident by the many anglers watching his whereabouts.   Here’s how:

Perch location

Perhaps the hardest thing about perch fishing through the ice is finding them.

Narrow the scope of the search by stopping at bait shops to ask for the latest information on where perch are biting.  “If they mention a particular lake, you’re ahead of the game,” Bohn said. Be specific when asking lake questions and perch locations, as hundreds of lake choices are available. In Vilas County and neighboring Oneida County, expect to hear names like Big Arbor Vitae, Carrol, Big St. Germain, Minocqua and North & South Twin Lakes. “Those would be good choices to get started,” he said.

Once you arrive, watch for other perch anglers.  This can be a good indicator on where perch schools are roaming on any given day.  Stay on the outside of any perch pack and be advised;  “Perch move a lot,” Bohn said.  “They will eat everything in sight and move on.  You might catch a bunch in one area one day and go back the next and not catch a one.”

The lesson in that bit of wisdom is this – to find perch, you must stay on the move, too.  Use portable ice shanties like the Fish Trap designed by Dave Genz.

Bohn focuses on two basic patterns.  One concentrates on shallow perch working the remaining green weeds.  The other centers on deep water, usually mud flats and deeper holes.

Early winter and weeds perch may be their eating small leeches and insect larvae.  In deep water, they are probably focusing on microscopic zooplankton or mayfly larvae known as “wigglers.”

If fish aren’t in one of those places, they will probably be in the other.

Start by checking for shallow weed fish first. Check weed patches on the edges of bars or dropoffs on the edges of flats. Those locations can produce all winter and become overlooked in exchange for deeper water areas. Perch will migrate along the sides or over the tops of the weed patches. Some larger crappie size minnows help to eliminate small perch!

Drill lots of holes and fish each one.  It’s often impossible to see these fish on the flasher because they can stay so tight to the bottom or in the vegetation.  You can’t tell if fish are there unless you drop your bait down to see.  An underwater camera like an Aqua-Vu can do the trick, too.  “It’s a mistake not to put a minnow or a waxie or a wiggler down the hole.  I can’t tell you how many times I’ve limited my fishing, by not searching,” he said. Searching with the Vexilar Flasher might work for bluegill, but don’t be fooled into thinking perch are not available.

If no fish are biting after a few minutes, head for deeper water.  Depending on the lake, deeper water can mean 20, 40 even 60 feet.  Fish go deeper and water temperature drops until they start to move shallower again in late February while preparing to spawn on sandy bottoms.  Perch are the first species to reproduce each year.

Look for deep mud flats off the tips of points.  Bohn uses the newer model Vexilar FL-18 package with the zoom feature.  He can concentrate on the area closest to the bottom where the fish are.

In low-light conditions at sunrise, a band of zooplankton often clutters the view of the bottom as they emerge from the mud.   That’s a good sign.  Perch won’t be far away. They love that stuff.

Bohn also likes the Aqua-Vu SV-100 and Aqua-Vu Scout SRT, which features Spectral Response lighting. Bohn seems to think that attracts zooplankton beneath his hole and jigging area.  An accessory Ice Pod Stand will keep the camera lens out of the mud.

Found them? Now what?

Bohn uses two different set-ups depending on the presentation he wants to use.  For jigging, Bohn likes the Dave Genz rod series in 28- and 30-inches.  He uses 4-pound Stren Magnathin, which has the diameter of 3-pound test. Helps hold onto the occasional walleye bite.

One of his favorite baits is a Nil’s Master spoon, a narrow spoon that has a short chain for added flash and action.  Bohn also uses size zero or size 1 Swedish Pimples.  Another good choice is a size 1 System Rattl’r or a small #6 Genz Worm.   Try the new Techni-Glo colors, especially in times of low-light. When do these Glo color patterns work-all day!

Try adding a split shot a few inches above the jig in order to get the bait down quickly to avoid wasted time.  Add three of four “spikes,” wigglers or two waxies for action, smell and taste of natural bait.  When fishing for perch, it is critical that the bait is alive.

For finesse fishing, Bohn turns to a shorter ice rod of 18 or 24 inches still-fished in a second hole.  He adds a spring bobber to the tip, and then pastes a glow bead on it to make light strikes easier to see.  Add a Thill Pro-Series Float PS105 or PSW105 (Weighted) designed by Greg rigged as a slip float for super light bites and for minnows. The new Pro Series Floats are getting huge acceptance from ice anglers across the Midwest.

With a crappie-sized minnow, use a split shot, hook or ice jig.  Hook the minnow near the tail.  This increases the action and perch like to take the minnows headfirst.  If the minnow tires, simply pick up the rod and jiggle it; that often wakes the minnow up and provokes a quick strike.

Don’t be surprised if you take a bonus walleye or two.

Perch action is good all the way to ice-out in late March.  There have been years when Bohn is still on the ice April Fool’s Day.

Next time you think about Vilas and Oneida County, Wis., don’t automatically think of walleyes.  Think perch.

Bohn enjoys the day with his clients, having a cookout right on the ice.  He provides everything you need and all you have to do is show up.  Strictly Walleye Websitewww.gregbohn.com Phone him at (715) 356-4633.

Posted on

Jig’n Up Winter ‘Eyes by Greg Bohn with Scott Richardson

Jigg’n Up Winter ‘Eyes by Greg Bohn with Scott Richardson

Ice jigging for winter walleyes is a fast growing technique spreading across many lakes in the Northwoods of Wisconsin, and for good reason – the method guarantees ice fisherman better walleye success.  Greg Bohn

It’s an exciting way to catch walleyes through the ice and can be done as a single tactic or in addition to setting tip-ups.  In Wisconsin, we are legally allowed to fish with three lines. I can drill and set two tip-ups and have a third option reserved for my walleye ice jigging rod.

You can trigger strikes during the daylight hours when nothing else works. But, my favorite time is after dark with glow-in-the-dark lures.   Rattle lures also will out-fish all other tactics after dark. Even lures like a Cicada which offers strong vibration when jigged upward can increase the amount of walleye strikes on any given night.

The spinning rod and reel combo used for ice jigging is nothing like summer fishing equipment. Choose short 24- to 30-inch rods with a medium to heavy action size.  Be sure to select ones with large eyelets as ice build-up is common. The ultralight reel should fit comfortably in your hand with gloves on. Good examples are models like the Tiny 20 ultralight reel, Shakespears 2500 ULX or Shimanos TX500. Spool up with #6 Stren Magnathin, #6 Berkley Cold Weather or #10 Berkley Fireline, which is my favorite.  Always ask your favorite sport shop sales person for their recommendations as they know what working.

Remember to set your drag. It should be lose enough to slip when you set the hook. All fishing lines break easily under cold conditions. Also, keep the line guides free from ice buildup whenever possible. Sharp ice will cut a line when the hook is set.

uploaded-2007-12-19-102133363
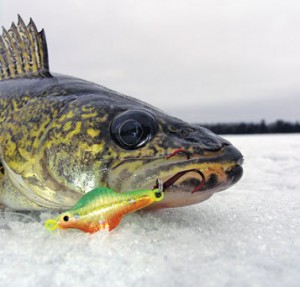
There are always several good “go to” lures and many that aren’t.  The old standbys like the size #3 and #4 Swedish Pimples, #3, #4 and #5 Jigging Rapalas will catch their share of nice walleyes. But with the growing interest in this method several new exciting choices are now available. They include the #2 and #3 Nils Master Jigging Series, Lindy’s Rattl’n Spoon and Northland Tackle Buck Shot Rattler in the 1/8 and 1/4 oz. sizes.   Perch patterns, silver shiner, firetiger, and glow color patterns are very popular choices.

Use #0 and #1 Split Rings on all your lures and spoons to enhance the swimming action.

When strikes are few and far between, try tipping the spoons with the head of a fathead minnow or Milwaukee shiner. This can trigger immediate strikes. Even when I leave my tip-ups behind,  I still bring along a couple dozen fatheads or shiners for tipping purposes.

Also, a couple waxies on the treble hooks of either the jigging lures or spoons can be dynamite.

Try ice jigging for walleyes in the same productive areas that tip-ups work. Weed beds, rock bars and deep mud flats are a few popular areas.

I start out jigging in the green weed beds in the 8- to 12-foot range. The early-ice green weeds will still attract baitfish and predator fish to that area. Winter walleye schools quickly come and go, as we all know, but if a walleye swims into my jigging area- I will most likely catch it.

Drill several holes prior to setting your tip-ups and jigging. By doing this you will be less likely to spook a walleye or school of walleyes that move into your area. Never drill or chop holes during the key fishing hours of dusk or after dark.

Move often from hole to hole because any hole can yield up to two quick fish. It’s rare to catch more than 2 walleyes at a time as they quickly spook. But coming back to that same active hole after a short break is a smart and productive move. I can’t tell you how many times I’ve looked down into the ice-hole only to see several nice walleyes. I often would rush to place a tip-up there with a tasty looking shinner without success. Had I known more about this ice jigging method back then, I would have had instant strikes.

Just remember LPS location and presentation equal success! Ever sit on your bucket right next to an ice fisherman that is catching one fish after another, and you can’t buy a bite?  It’s happened to us all. Those ice anglers that seem to always be successful at “ice jigging for walleyes” really have perfected the lure presentation and technique.

I’ll give you an example that I think says it all. I spotted a #3 lb walleye directly under my hole on Minocqua Lake as I was jigging my #3 perch pattern Rapala. The fish would not strike that lure no matter how I jigged it. Finally, I set the rod down across my pail after several minutes and,  you guessed it, BANG. Who knows what jigging method will work on any given day?   But, one thing is for sure and that is it’s important to mix it up.

Drop your lure to the bottom. Never hold the line in your finger-unless of course you don’t need that finger anymore. Close the bail and firmly hold the rod in your hand. Start out by moderately snap jigging the spoons or lures upward.  Always hold tension on those lures as they free-fall back down. Stop the lure about one foot off the bottom and hold it there very still! Holding a (2- to 3-second) pause is best before repeating your jigging.

Occasionally tapping or lightly touching these lures on the lake bottom is a good way to provoke negative walleyes into striking. But remember, most walleyes strike the bait offering when it’s level or slightly upward.  Many active walleyes are turned off, by the ice angler holding the spoon too close to the bottom. Keep repeating the method for up to 5 minutes per hole. Don’t get lazy. It’s important to keep moving and searching the various holes for active fish.

The best presentations are obviously those that work but you must also find the active walleyes. It’s amazing how quickly you can “Fine Tune” this technique. Each individual lure has its own special shake, wobble, sound and darting action. Experimentation is the neat thing about this method. It is a challenge. I’m always learning more every time out on the ice.

Give Jigging For Winter Walleyes a try next time you hit the ice. It’s exciting, productive and should not be overlooked! Drill allot of holes, move often and you’ll be hooked too!